What Causes Grain in Video and How to Fix It (Complete Guide for Creators)

Have you noticed grain in your videos and wondered what causes grain in video? This noise can affect the quality of your footage, especially for content creators in the United States in 2025. Whether you are shooting real estate videos or vlogging, MTT COLOR will guide you through what causes grain, how to prevent it, and how to fix it. Let’s get started!
What Is Grain in Video?
Definition of Grain or Video Noise
Grain in video, commonly referred to as video noise, appears as tiny, speckled dots across your footage, especially in darker areas. It’s a visual artifact that disrupts clarity, often making videos look unprofessional. For creators in the US, where high-quality video content is expected, understanding what causes grain in video is the first step to achieving crisp visuals.
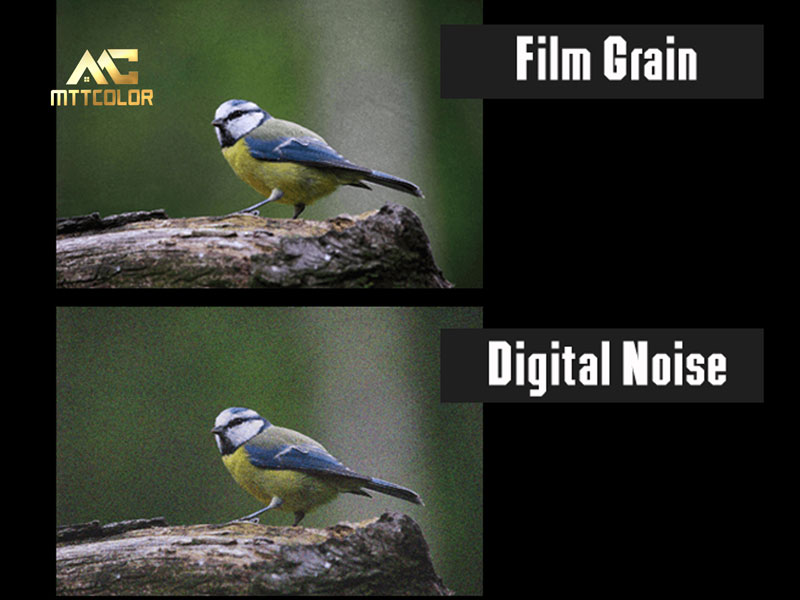
Film Grain vs. Digital Noise
Film grain and digital noise are often confused, but they’re distinct. Film grain is a textured effect from analog film, historically used for artistic purposes in cinema. Digital noise, however, is unwanted and results from technical issues in modern cameras, like high ISO or low light. While film grain can be intentional, digital noise is typically a problem creators want to eliminate.
When Is Grain Visible?
Grain becomes most noticeable in low-light conditions, such as indoor shoots or night scenes, where cameras struggle to capture detail. It’s also visible in underexposed shots, high ISO settings, or compressed videos. For example, real estate videographers filming dimly lit interiors often encounter grain if lighting isn’t optimized.
Main Causes of Grain in Video
Low Light Conditions & Underexposure
One of the primary reasons for what causes grain in video is low light. When shooting in dim environments—like indoor spaces without proper lighting—your camera boosts sensitivity to capture more light, often leading to noise. Underexposure, where the footage is too dark, exacerbates this issue, especially if you try to brighten it in post-production.
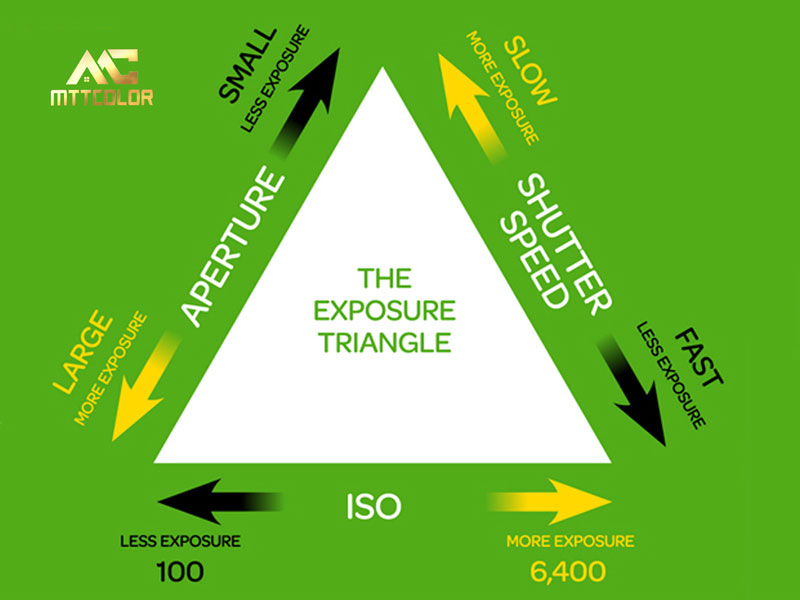
High ISO Settings
High ISO settings are another major contributor to what causes grain in video. Increasing ISO (e.g., to 3200) boosts light sensitivity but also amplifies noise. Most cameras, including models like the Sony a7 IV, show noticeable grain above ISO 1600, depending on the sensor’s capabilities.

Low Video Resolution
Low-resolution videos (e.g., 720p or below) are more prone to grain because they lack the pixel density to render details smoothly. Modern US audiences expect at least 1080p, and shooting in 4K can help reduce perceived noise by providing more data for post-processing.
Video Compression and Low Bitrate
Compression at low bitrates is a frequent culprit behind what causes grain in video. A video shot at 10 Mbps will appear noisier than one at 100 Mbps. Platforms like YouTube further compress footage, so using a high bitrate (e.g., 50 Mbps for 1080p) helps minimize grain during export.
Incorrect Camera Settings
Incorrect settings, such as a shutter speed that’s too fast for the lighting conditions, can cause underexposure and noise. Using the wrong picture profile (e.g., a flat profile without proper exposure) can also make grain more apparent when you adjust the footage in editing.
Is Grain Always Bad? (Technical vs. Artistic Perspective)
When Grain Is Used Intentionally (Artistic Use)
Grain isn’t always negative. Many US filmmakers, like those in indie cinema, add film grain for a nostalgic or gritty aesthetic. For example, movies like The Batman (2022) use grain to enhance mood. Tools like Dehancer allow creators to add film grain stylistically, mimicking 35mm film for an artistic effect.

When Grain Is a Problem (Technical Issue)
Grain becomes a problem when it’s unintentional and detracts from quality, such as in real estate videos where clarity is crucial. Excessive noise can make footage look amateurish, especially for professional projects like corporate ads or property tours, where US clients expect clean, polished visuals.
How to Prevent Grain While Shooting
Use Proper Lighting Techniques
Proper lighting is key to preventing grain. Ensure sufficient light, especially for indoor shoots, to keep ISO low. Use softboxes or LED panels (e.g., Aputure 300d II, starting at $999) to evenly illuminate spaces. For real estate videography, position lights to mimic natural daylight, reducing the need for high ISO settings.

Set the Right ISO and Aperture
Choose the lowest ISO possible—ideally under ISO 800 for most cameras—and pair it with a reasonable aperture (e.g., f/2.8 or f/4) to let in more light. For example, a Sony a7 III performs well at ISO 400 in low light, minimizing noise while maintaining exposure.
Understand Your Camera’s Limits
Every camera sensor has an ISO threshold where noise becomes noticeable. Test your camera (e.g., Canon R6) in various lighting conditions before a real shoot. Knowing its limits—like ISO 1600 for a Sony a6400—helps you avoid settings that contribute to what causes grain in video.

Use Log Profiles and High Bitrate Formats
Shoot in log profiles (e.g., S-Log3) to retain dynamic range, making it easier to adjust exposure without amplifying noise. Record in high bitrate formats (e.g., 100 Mbps) to preserve detail. Using 10-bit 4:2:2 footage reduces the risk of grain during editing, tackling another aspect of what causes grain in video.
Use Log Profiles and High Bitrate Formats
How to Fix Grainy Video in Post-Production
Noise Reduction in Editing Software
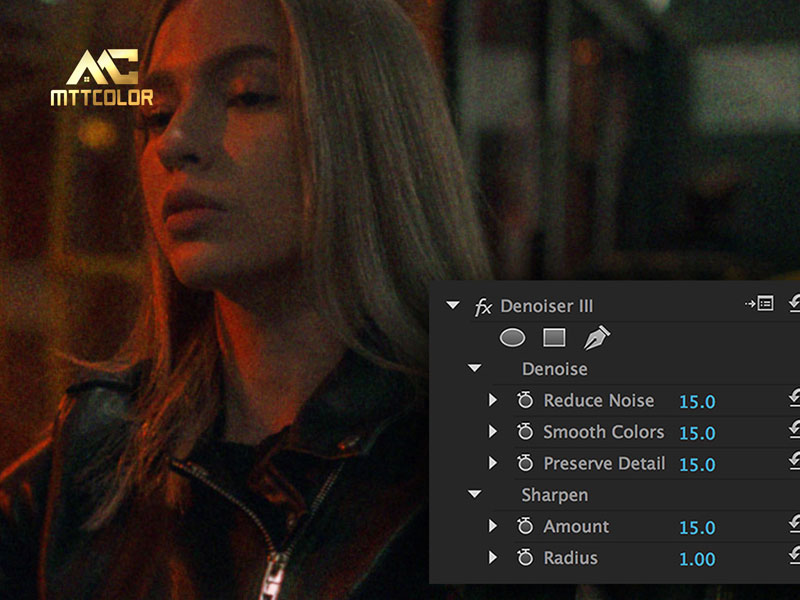
Most editing software offers noise reduction tools to fix grainy footage. In Adobe Premiere Pro, use the Lumetri Color panel’s “Noise & Grain” section to reduce noise while preserving detail. In DaVinci Resolve, the Noise Reduction tool under the Color tab allows temporal and spatial denoising—start with a luma threshold of 10 and chroma at 15. For Final Cut Pro, apply the Noise Reduction effect and adjust the amount slider to balance clarity and smoothness.
Noise Reduction in Editing Software
AI-Based Tools for Grain Removal
AI tools can intelligently remove grain while retaining detail. Neat Video ($89.90) is a plugin for Premiere Pro and DaVinci Resolve, using AI to analyze and reduce noise with minimal quality loss. Topaz Video AI ($299) offers advanced denoising, upscaling grainy footage to 4K for a cleaner look. MTT Color provides professional editing services, including grain removal, starting at $1.50 per clip, ideal for US creators needing quick, high-quality results.
Avoiding Over-Denoising
Over-denoising can blur videos, losing sharpness. Apply noise reduction gradually—start with low settings (e.g., 10% in Neat Video) and preview on a large screen. Focus on denoising darker areas while preserving textures, like in real estate shots, to maintain a natural look after addressing what causes grain in video.
Before & After – Real World Examples
Indoor Shot Comparison
Consider an indoor real estate video shot in a dimly lit living room at ISO 3200. Before editing, the footage shows heavy grain, especially in shadows. After applying noise reduction in DaVinci Resolve (temporal threshold: 15) and brightening exposure by 1 stop, the grain is significantly reduced, revealing clean details in furniture and walls.


Night Exterior Example
A night exterior shot of a property, filmed at ISO 6400, often exhibits noise in the sky and dark areas. Using Topaz Video AI, we applied AI denoising and upscaled to 4K, reducing grain by 80%. Adjusting the exposure and contrast in Premiere Pro further enhanced clarity, making the property’s exterior lighting pop without noise distractions.

Recommended Tools and Services for Noise Reduction
Free Tools vs. Paid Tools
Free tools like Premiere Pro’s built-in noise reduction are accessible but limited in precision, often softening details. Paid tools like Neat Video ($89.90) offer advanced AI denoising with customizable profiles, ideal for professionals. Topaz Video AI ($299) excels in upscaling and denoising, perfect for 4K projects. While free options are cost-effective, paid tools provide better results for US creators aiming for high-quality output.
When to Outsource Editing
If you’re on a tight deadline or lack editing expertise, outsourcing is a smart choice. Services like MTT Color offer professional noise reduction, Video Editing, and color grading starting at $1.50 per clip. This is especially useful for real estate videographers in the US who need polished footage quickly without investing in expensive software.
FAQs – Common Questions About Video Grain
Why Is My Video Grainy Even with Good Lighting?
Even with good lighting, grain can occur due to high ISO settings, incorrect exposure, or a low bitrate. Check your camera settings—ensure ISO is below 800 and use a high bitrate (e.g., 100 Mbps) to preserve quality.
How Does ISO Affect Grain in Video?
ISO increases light sensitivity but also amplifies noise. Higher ISOs (e.g., 3200) introduce more grain, especially in low light. Keeping ISO low (e.g., 400) minimizes the effects of what causes grain in video.
Can Grain Be Removed Completely?
Grain can be significantly reduced but not always removed completely without affecting quality. Tools like Neat Video or Topaz Video AI can reduce noise by 80–90%, though some residual grain may remain in extreme cases.
Is There a Camera That Doesn’t Produce Grain at All?
No camera is completely grain-free, as noise is inherent to digital sensors. However, high-end cameras like the Sony a1 or Canon R5 produce minimal noise at low ISOs (under 800), thanks to advanced sensors and noise reduction algorithms.
Should I Add Grain Intentionally to My Video?
Adding grain intentionally can enhance the artistic feel of your video, especially for cinematic projects. Use tools like Dehancer to add film grain for a vintage look, but avoid it for professional shoots like real estate videos where clarity is key.
Related Posts
Tips & Trick for Real Estate Photography & Videography
By: MTT COLOR
May 9, 2025
Real Estate Video Pricing in 2025: What You Should Expect to Pay
In a visual-first real estate market, professional video has become one of the most powerful tools to capture buyer attention and showcase property value. At MTT COLOR, we specialize in producing high-impact real estate videos that help listings stand out across platforms. But how much should you expect to pay for a high-quality listing video? […]
Read more
By: MTT COLOR
May 7, 2025
Videography for real estate attract potential customers
In a digital-first real estate market, standing out requires more than just professional photos. Today’s buyers expect immersive experiences that help them connect emotionally with a property before ever stepping inside. That’s where videography for real estate becomes a game-changer. At MTTCOLOR is a unit specializing in providing video editing services.we specialize in creating compelling, […]
Read more
By: MTT COLOR
May 7, 2025
Drone Video for Real Estate: Complete 2025 Guide to Boost Sales
Drone video for real estate has revolutionized property marketing, becoming one of the most powerful tools in 2025. With 82% of buyers saying they want to see drone footage when viewing properties online, this technology is no longer just an option—it’s essential for competitive agents and developers. Drone video for real estate transforms listings into […]
Read more
By: MTT COLOR
May 7, 2025
Video Walkthrough Real Estate: Sell Listings Visually
Today’s homebuyers expect more than just pictures—they want to experience a property before they ever set foot inside. That’s where video walkthrough real estate content comes in. This powerful visual tool helps agents and sellers present homes with clarity, flow, and emotion—making listings more engaging and easier to trust. At MTT Color, we’ve helped countless […]
Read more
By: MTT COLOR
May 7, 2025
Commercial Real Estate Video Marketing: How to Stand Out in a Competitive Market
In 2025, commercial real estate video marketing is a game-changer for US agents and firms aiming to capture attention in a crowded market. Videos showcase properties dynamically, engage potential clients, and drive faster sales. This guide explores why commercial real estate video marketing is vital, the best video types, platforms, creation tips, SEO strategies, 2025 […]
Read more
0
Images Processed Everyday
0
Happy Customer
0
Year Experience

MTTCOLOR
is the leading real estate photo and video editing service, trusted by thousands of satisfied customers around the globe. With over 10 years of experience in both photo and video editing for real estate we specialize in helping clients buy, sell, or rent properties with stunning, professionally edited images and videos. Let us bring your dream home to life with our expert real estate editing services.
Frequently asked questions
How much do your services cost?
We cater to customers at various price points, ranging from around $0.50 per image to over $3 per image. We understand that you may have a specific budget in mind for outsourcing. That's why we're very flexible with pricing. Feel free to propose your numbers, and we'll do our best to accommodate. We're also open to discussing everything to ensure a smoother process.
Please note that in Vietnam, it is customary for the customer to cover PayPal fees (or any transaction fees), and we recommend doing so. On our end, we cover currency conversion fees, which are quite similar. Think of it like splitting the bill at a restaurant.
How can I send files?
Simply upload your images on Dropbox, Google Drive, or Wetransfer and send us the link in an email. To make things easier, you should specify the number of input files along with any special requirements.
How does the process work?
Before using our services, you can send us a test order of up to 10 images, and we’ll do it FREE of charge just to understand your style. After that, we can agree on the pricing and proceed from there.
Outsourcing post-production has never been easier:
Step 1: You can either fill out the test order form or send your input directly to our email via Dropbox, Google Drive, FTP, or Wetransfer. We’ll send you a confirmation email to let you know we’ve received your order.
Step 2: Your images/videos will go through thorough editing and quality checks.
Step 3: Receive your package and complete the payment transfer. You can also send us any revision requests if needed.
What are your working hours?
We work 24/7, always available to support you.
Can I request urgent orders?
Yes, with a large team of editors, we can prioritize and accommodate rush delivery if possible. Please give us a heads-up via email at mttcolor8@gmail.com at your earliest convenience so we can check the feasibility and timeline for these special orders.